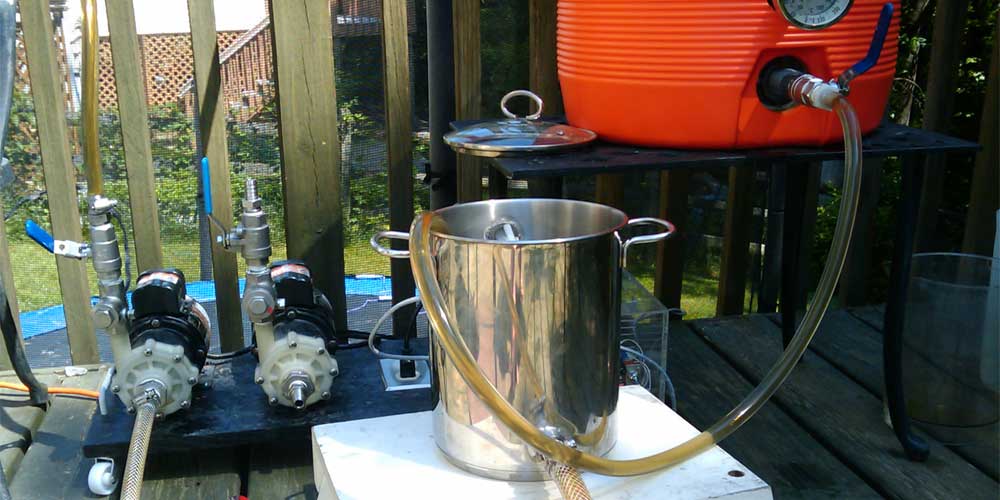
For most homebrewers, buying your first pump is a significant investment in your brewing system. A good brew pump will speed up wort transfers and allow you to recirculate your mash.
This will not only improve the clarity of the beer you brew, but will allow you to become more efficient and save you time. A pump can be a fantastic investment in your home brewery. Because of this importance, choosing the right brewing pump is vital. In fact, buying the right pump for your brewing setup will make a significant difference in cleanup time, contamination risk, and cost.
In order to help you choose the right brew pump for your specific situation and setup, we’ll evaluate a few different types of pumps, as well as discuss the pros and cons associated with each. The three most common types available to home brewers include peristaltic, centrifugal, and diaphragm pumps.
Uses for Pumps
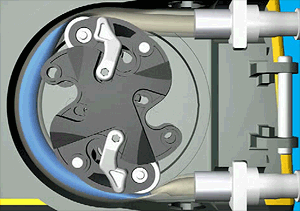
Photo Credit: Wikimedia / Njmcca
To understand what you need from your pump, think about how you intend to use it. When it comes to brewing beer at home, there are many ways a pump can benefit you. And having a pretty good idea of how you plan to use it, will make it far easier to buy the best brew pump for you.
One of the most common uses is to transfer hot water into the top tier of your brewery, for instance. You can also recirculate your mash or pump from the mash tun to the kettle. You can also use a cleaned and sanitized pump to circulate your wort through a counterflow chiller and into the fermenter.
Once the beer has fermented, you can use your pump to move beer between fermenters or into the keg for carbonation. So, when you consider which pump to purchase, it’s recommended that you consider how you intend to use it while brewing.
1. Peristaltic Pumps
 Peristaltic pumps are a great design, especially for brewing. The functionality is incredibly simple, but effective. Essentially, the liquid passes through flexible tubing which is compressed from one end to the other by mechanical means. Think of squeezing a toothpaste tube from the bottom to the top.
The distinct advantage of this motion centers on the fact that the only part of the pump that touched your wort is the tubing, which reduces the risk of contamination and makes cleanup far easier. Another advantage of this type of tube is that it is typically self-priming, which can save a lot of headaches and can keep you from burning out your pump by running it dry.
Unfortunately, peristaltic pumps are not typically an option for homebrewers due to the cost, but if you find a good one on eBay or are handy enough to build your own with some high-temperature tubing, this type of brew pump is a great addition to any homebrewer.
The cost of a peristaltic pump tends to be significantly higher than for a centrifugal or diaphragm pump, landing between several hundred and several thousand dollars. With a little research online, however, you can easily build one yourself. A common brand of peristaltic pumps often used by commercial brewers is the Masterflex I/P series. These are fantastic and will definitely help you make better beer, but they are typically too expensive for the average homebrewer.
2. Diaphragm Pumps
 Another less-common pump for homebrewers is a diaphragm pump. The design of a diaphragm pump allows liquid to move in and out of a diaphragm, by increasing and reducing pressure in the pump housing alternately. The valves in the pump keep the liquids moving in one direction, preventing backflow problems.
Diaphragm pumps are fantastic for transferring liquids at lower temperatures, but their temperature thresholds typically max out at about 130-150° Fahrenheit. This makes it a bit problematic for recirculating wort or transferring hot wort through a chiller, but can be used to help move cooled wort into the fermenters or for pumping beer from primary to secondary fermenters or into kegs for carbonation. The fact that they are self-priming makes them an excellent choice for these functions, too.
Diaphragm pumps are a bit harder to clean than peristaltic pumps, but they are far less expensive than either of their counterparts. You can typically pick up a new one for between $140-170, but it’s not uncommon to find used ones online, as well. Shurflo makes a variety of different models that are great for a wide range of uses.
Unfortunately, while these brew pumps are great for transferring cool wort, you would still need to have an additional pump for hot side transfers. So while his type of brewing pump is less expensive, you would still need to buy a centrifugal or peristaltic pump for the hotter functions. This is not an economical solution for most homebrewers.
3. Centrifugal Pumps
 Centrifugal pumps are probably the most common brewing pump. They have a low enough cost to be manageable on most homebrewers’ budgets, and they can handle high enough temperatures for them to be functional for hot wort transfers and recirculating the mash.
Centrifugal pumps are simple machines, but there are some very important rules that have to be followed when using the pump. For instance, the pump must be kept below the liquid level being pumped. The pump is not self-priming, which means it should not be started until the liquid is in the pump, and the pumps should never be allowed to run dry or you may burn out the motor.
Regulating the flow on the pump is done by placing a ball valve on the outflow of the pump, allowing you to throttle the flow as it leaves the pump. That feature is incredibly important for recirculating the mash, as having the flow move too quickly will result in a stuck mash and
cause problems for your brew day.
The most common brand for homebrewers is March Pump, as they make incredibly reliable and functional centrifugal pumps, but there are a lot of good brands to choose from. The Chugger Pump is a great alternative and has a stainless steel head on it, which lasts longer and won’t crack if you accidentally drop it.
Other Considerations
In addition to those specific advantages and disadvantages of the types of brew pumps, make sure you pay attention to the other technical specifications of the pump you are evaluating. Before buying any pump, make sure it is food-grade. If the pump is not food-grade, it is not safe for use in brewing, especially at higher temperatures.
In addition, make sure the pump you are buying has the flow rate you need. For most brewing applications, a flow rate will never need to be above 5 gallons per minute, but you can find higher-speed pumps to make your brew day a little faster. Note that the faster pumps may need to have the flow restricted when recirculating the mash or transferring out of the mash tun to prevent the stuck mash problem.
The final item you should always watch for is the temperature rating. For hot wort transfers, it is strongly recommended that you use a pump with a temperature rating over 220 degrees.
Setting Up Your Brew Pump
To set up your brew pump, you should always consult your owner’s manual. While they all have a very similar fundamental setup, there may be a few pumps that require a little something extra. Some basic setup rules apply to all pumps, however.
Use A GFCI Outlet: I would strongly recommend that you make sure you are using a GFCI outlet. You’ll be using this pump in a wet environment, so a GFCI outlet may save your life.
Mounting Your Pump: Make sure the pump is mounted securely before use. You don’t want to spend a couple of hundred dollars on a pump and then crack the housing on your first day brewing with it because you didn’t make sure it was mounted correctly.
Food Grade Tubing: Make sure your tubing is appropriate. It should be food grade and heat tolerant to boiling temperatures, and it should be the right size for your pump’s fittings.
If you are regulating the flow of the pump, make sure you install the ball valve correctly, and that you have all of the valves leading into the pump open before turning on the pump. Once you have your pump picked out and installed, get ready for your brew day to be a lot faster and easier.
Source: kegerator