
If you’ve ever tried to figure out your mash efficiency, monitor your evaporation rate, or compare your boil volumes to what your recipe estimated, you very quickly find a need to measure your brew kettle volumes at various stages during the brew day. Unfortunately, a lot of brew kettle manufacturers do not include volume markers.
Some brewers install an expensive sight glass into their kettle to monitor volumes. Some brewers dip a homemade measuring stick into the wort. I used to use a measuring stick, but I got sick of relying on an extra tool during brew day and the added risk of contamination.
While researching metal etching, I came across a technique commonly used by knife manufacturers to leave their brand on their knives. This technique involves electrolytic acid etching. It sounds complicated, but I’ve adapted it to require nothing but cheap household materials.
In this technique, we are going to use vinegar for our acid. To facilitate this process, the vinegar must be conductive. In order to make the vinegar conductive, we simply add an electrolyte, in this case, salt.
The power source should be around 9 to 12 volts. Batteries work great. If you have a spare DC wall adapter lying around, that would work perfectly in place of a battery. Running DC power (like from a battery) or a DC adapter will leave a frosty white mark. If you run AC power, it will burn in a darker black mark. Both marks will be permanent.
To apply the acid and the current, you’ll construct an etching tool from a Q-tip. The cotton head of the Q-tip will hold the vinegar solution, and a wire running from a battery will transfer the current to the vinegar-soaked cotton.
This method is not limited to kettles or volume markings. You could add a logo to nearly any piece of metal equipment (both aluminum and stainless steel). Imagine your custom logo all over your homebrewery!
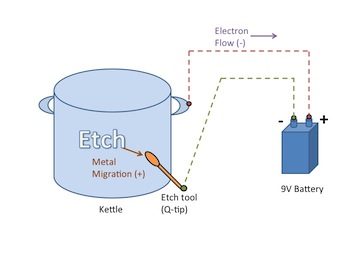
So how’s it work? Here’s the science behind it: In the vinegar, the salt dissolves into positively charged sodium ions and negatively charged chloride ions. This allows current to travel through the solution. In the presence of acid (vinegar), the electrical current causes the ions in the metal to dissolve so they can travel in the direction of the current, which, in this case, is away from the metal. This permanently removes metal from the surface, which changes its texture. The different texture reflects light differently — making the markings permanently visible. The reaction also produces carbon dioxide, which causes the fizzing. This is the opposite process to electroplating, which would be the result of reversing the polarity.
The first question I always get is about corrosion risks. Stainless steel and aluminum both naturally form oxidized coatings on their surfaces when exposed to oxygen. This oxidized layer is what protects them from rust and corrosion. A few seconds after etching, the surface of the etched areas will oxidize again and will be the same as the rest of the brew kettle, thereby protecting it.
Materials Needed:
- Brew kettle;
- White vinegar with 5% acidity;
- Salt;
- 9-volt battery or power source;
- Electrical wire;
- Electrical tape;
- Q-tip;
- Stencils.
Steps
-
Tape the kettle
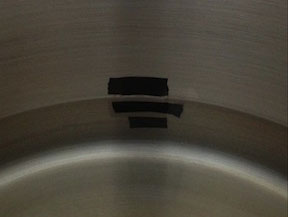
Fill the kettle with water in increments that you wish to have marked on your kettle and tape it off as you go (make sure you trust the container you are basing your measurements on). For me, I poured one gallon (3.8 L) of water at a time. You’ll want to use tape that won’t lift off while under water. If your container has straight walls, you can measure the gap between two water levels and repeat the measurement up the wall of the kettle. Alternative to tape, you could use a wax or grease pencil. Make sure the kettle is level before doing this. An uneven surface will cause the water level to be off. -
Apply stencils
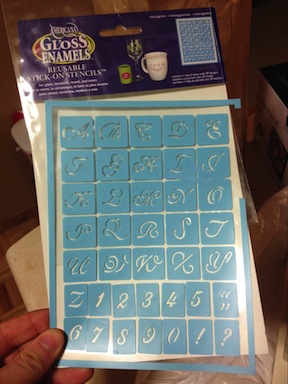
These should be available at the nearest craft store. Adhesive stencils are the best type for this project since they will stay put and do the best job controlling the vinegar during the etch. Make sure they are stuck down very firmly and are in place exactly where you want them. Getting the stencils just right before you begin etching makes the project less stressful. -
Mix your acid solution

Combine your vinegar and salt. The ratio isn’t that important, you just need enough salt to allow current to pass through. I used ¼ teaspoon salt in ¼ cup of vinegar. Then give the solution a good shake or stir to dissolve the salt. -
Hook up the kettle
It is very important that you hook the positive lead to your kettle. There is nothing fancy about this connection. You can simply tape the bare electrical wire directly to any part of the kettle. This connection will essentially electrify your entire kettle with a very low voltage, preparing it to be etched at any location on its surface. Don’t worry; the current is so low that you can safely handle the kettle without any danger, similar to touching both ends of the battery itself. -
Prepare etching tool
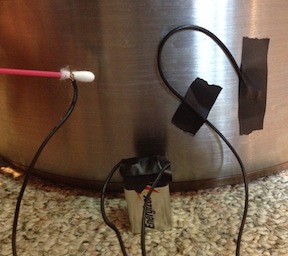
With another wire, attach the negative lead to the Q-tip. The wire will need to be in direct contact with the vinegar solution, so make sure it is wrapped around the cotton head of the Q-tip. Give it a good tight twist so it will stay on as long as you want it to. I found that the wire will actually dig into the cotton so you don’t need any tape for this step. -
Etch

Before etching your expensive brew kettle, I strongly recommend testing this process on another piece of metal that you don’t care as much about or a very inconspicuous area of your kettle such as the inside of the lid. You don’t want any surprises.Dip the Q-tip in your vinegar solution and touch it to the kettle. If you hear some sizzling or see some bubbling, it is working. It only takes a few seconds of contact to permanently dissolve some metal. Keep the Q-tip moving. If it stays in one spot too long, it will make uneven marks. As you etch, your Q-tip will absorb byproducts of this reaction and start to change color. In my experience, this did not affect the etching. Remember, anywhere you touch the etching tool to the brew kettle will be permanently modified, so be sure to take your time.
source: byo
also: “DIY: Kettle Etching”